


-
在Ubuntu中将CD或DVD制作成ISO文件的简单方法
Posted on May 24th, 2009 Add comments工作中,经常会发生一些情况,需要去备份一张CD或者DVD。在Windows下通常需要一些软件,将CD或者DVD压缩成ISO文件。而在Ubuntu中,可以通过打几行很简单的命令快速实现:
- 1. 首先确定光驱在Ubuntu下的位置:
使用以下命令:
df -h在我的Ubuntu中,显示如下
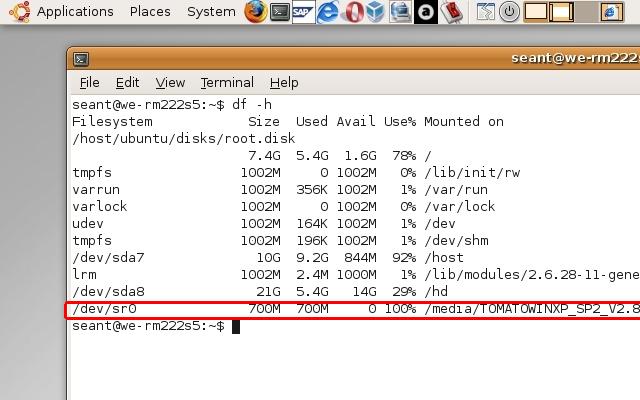
- 2. 通过上一步,确定光驱的位置是 /dev/sr0,就可以开始制作ISO文件:
# cat /dev/sr0 > myISO.iso
- 3. 上一步中myISO.iso就是制作出的CD或者DVD的备份,可以轻松的使用任何虚拟光驱导入ISO文件
- 1. 首先确定光驱在Ubuntu下的位置:
-
如何破解G1(中文版)
Posted on May 20th, 2009 2 comments1. 首先要把G1降级到RC29版本 (适用于美版G1)
对于大多数G1拥有者来说,他们的版本都会高于RC29,而只有RC29版本才能取得root的权限。所以,首先要把G1的版本降级到RC29。- 将G1的MicroSD卡格式化成FAT32格式
- 下载,解压缩镜像文件 RC29。 拷贝文件 “DREAMIMG.nbh” 到内存卡 (必须要在根目录下)
- 关机
- 同时按住相机键和电源键打开G1并进入 bootloader 模式。 这时会看到白色屏幕,中间有提示如何用内存卡中的文件flash手机。
- 按电源键,手机进入刷机程序。 这时,不用做任何动作影响手机。(最好放到桌子上等待)
- 当刷机程序结束后,同时按通话键,menu键和电源键重启手机。
2. 为G1取得root权限
“为G1取得root权限” 是指得到root的权限,然后可以利用这个权限去修改G1的内核和安装一些只有root才能安装的程序。- 下载文件 recovery.img 并放到内存卡中。(必须是根目录下)
- 下载文件 Hard SPL 并将zip文件放到内存卡中
- 以上的所有文件都必须正确的放在内存卡的根目录下
- 重启G1,等待G1完全启动直至进入主画面
- 等G1完全启动后,打开键盘,先按enter键若干次,然后输入”telnetd” 并按enter键 (这时电话本可能会跳出,不用管它)
- 从Market下载 “Telnet” 软件,打开后连接至 localhost
- 如果连接正常,屏幕会出现 “#” 符号。
- 这时需要输入以下命令
- mount -o rw,remount -t yaffs2 /dev/block/mtdblock3 /system
- cd sdcard
- flash_image recovery recovery.img
- cat recovery.img > /system/recovery.img
3. 升级G1到高手们制作的ROM版本
现在,已经取得root权限的G1,可以根据自己的需要,通过使用 HardSPL 把G1刷成任何想要的版本,并且可以备份手机资料,或者恢复原厂设置。
以下是一些高手制作的 ROM,可根据需要下载:
JFv1.50 ADP1.5
Dude’s Cupcake V1.1- 下载自己需要的ROM
- 将下载来的文件改名为 update.zip
- 拷贝到内存卡中 (一样要是根目录下)
- 关机,然后同时按Home键与开机键开机,并进入恢复模式
- 同时按 alt 键和 W 键清除G1的缓存,然后再同时按 alt 键与 S 键启动刷机程序
- 等刷机程序结束后,同时按Home键与返回键重启手机
-
How to root your G1
Posted on May 18th, 2009 Add comments1. Downgrade your phone to RC29 (US edition)
For most people, their G1’s version should be higher than RC29 which is the rootable version. So, we have to downgrade the G1 to RC29 first.- Format your G1’s MicroSD card to FAT32
- Download and unzip RC29 image file. Copy the “DREAMIMG.nbh” file to MicroSD card (root directory)
- Turn the G1 power off
- Hold Camera button, and press Power button to entry bootloader mode. You should see a gray and white screen with instructions to flash your phone with the update image on your MicroSD card
- As per the on-screen instructions, press the Power button to start upgrade procedure. DO NOT DO ANYTHING TO INTERRUPT THIS PROCESS
- After it is finished, restart your G1 by holding talk, menu and end keys
2. Rooting your phone
“Rooting G1” means to have the root permissions, then you can do whatever you want as root, such modify the kernel or install the application which needs root permissions.- Download recovery.img and copy it to your SD card (also root directory)
- Download the Hard SPL and copy the zip file to the SD card
- All files must be on the root directory of your MicroSD card
- Restart your G1. Wait for your phone to start up fully and show the home screen
- After your phone starts up, use the keyboard to hit the enter key twice, type “telnetd” and press enter. (contact search might show up, just type it.)
- Download “Telnet” application from the Market and connect to localhost
- If connect successfully, you should have a root prompt “#” on the screen
- Type the following
- mount -o rw,remount -t yaffs2 /dev/block/mtdblock3 /system
- cd sdcard
- flash_image recovery recovery.img
- cat recovery.img > /system/recovery.img
3. Upgrade your G1 to customized ROM
Now that you have root, you can use HardSPL to apply flash other ROM images, create full backups of your phone, install the latest build from the Android source, and usually resurrect your phone if it is “bricked”.
There are some customized ROMs:
JFv1.50 ADP1.5
Dude’s Cupcake V1.1- Download the customized ROM image you want
- Rename it to update.zip
- Copy it to your MicroSD card (root directory)
- Turn your phone off, and start up in recovery mode by holding Home and pressing Power
- Press alt-W to wipe your device, and Press alt-S to apply the customized ROM image
- After the update is complete, hold Home and press Back to restart
-
G1手机系统Android破解及开发
Posted on May 14th, 2009 Add commentsG1到手后的这两个月来,一直在研究这个东东。基本上说,G1使用的系统Android完全是一个袖珍的Linux,和我们平时在电脑中使用的Linux操作系统差不多,可以说是麻雀虽小、五脏俱全。使用Linux系统的人都知道,想操作及开发这个系统,前提是要有root权限,但Google在这款手机零售的时候,却默认的对用户关闭了root权限。也就是说,如同Linux下的普通用户一样,对于Android的文件系统,user只有r+x,没有w权限。所以,所谓的G1破解过程,其实就是打开Android中root权限的过程。
Android中的软件基本是使用JAVA来编写的。由于是开源软件,可以很轻松的找到其Windows版本的SDK和IDE,加上JAVA,再加上几瓶可乐,就可以自己为它编写程序。
不过最近还是一直在OS系统上下功夫,过两天发个中英文总结上来,方便保存。 -
How to be cool?!
Posted on May 11th, 2009 1 comment现在穿衣服都要酷,尤其是裤子,一定要露出内裤以致屁股才行。问题是露多少呢:


 (No Ratings Yet)
(No Ratings Yet)
(No Ratings Yet)
(No Ratings Yet)
(No Ratings Yet)
(No Ratings Yet)
(No Ratings Yet)
(No Ratings Yet)
(No Ratings Yet)Networks
Visitor Counter
- Total Visitors 277,864
- Visitors today 8
- Page views today 45
- Curently online 3
- Page views of current page 263
 Statistics
- Counterstart 2014-12-11
Recent Comments