-
Best way to create you own php.ini on Windows host
Posted on June 25th, 2012 Add commentsI have a Windows host package on Godaddy.com, and recently moved my wordpress blog to this hosting server. Sometimes I need to change some php settings for the wordpress, so I decide to create my own php.ini instead of using Godaddy one.
First of all, we don’t need to create a brand new php.ini from scratch. We can just use Godaddy’s default php.ini as reference. So, just create a php file called “phpinfo.php”, put the following code below and upload the file to your hosting server (this step is to find where the Godaddy’s php.ini file located. If you know the location, just skip this step):123<?phpecho phpinfo();?>Browse this file from your hosting, and will see the phpinfo page including all the settings. Look at the line of “Loaded Configuration File” section, find the location of Godaddy’s php.ini. In my case, it’s “c:\cgi\php5\php.ini”.
Next, create another file called “phpfile.php”, and put the following code below, then upload to the server.123<?phpsystem("type c:\\cgi\\php5\\php.ini");?>Browser this file and get a page with lot of plain text. Use your browser to view the source of this page, save the source as “php5.ini” (Note: NOT “php.ini”), and you got Godaddy’s php.ini already.
In my case, I just need to change some settings like below:12max_execution_time = 300 //from 30 secmemory_limit = 128M //from 32MAfter modified your php5.ini, upload it to the root directory of hosting server. In Godaddy hosting, you need to do the following:
- Log in to your Account Manager.
- Click Web Hosting.
- Next to the hosting account you want to use, click Launch.
- In the Content section of the Hosting Control Center, click the IIS Management icon.
- Click Recycle App Pool and follow any prompts.
- Reload the phpinfo.php page to see if the desired changes have taken effect.
174 views -
MVC3 with IIS7 credential error
Posted on March 19th, 2012 Add commentsWhen I deploy my new MVC 3 project to a Windows 2008 R2 with IIS 7 server, I got an error with “401 – Unauthorized: Access is denied due to invalid credentials” on every page.
After some google’s, I figure out the reason was: in my “_layout” page, I have the code “@Html.RenderAction(…)”, and the action I was trying to render actually is under “Home” controller with “[Authorize]” attribute. In another word, when IIS calling MVC pages, ASP.NET will ask for authentication, and if not authenticated, it’s supposed to redirect to “_logon” page, but unfortunately the “_logon” page (which is using “_layout” as master page of cause) also asked for authentication because of rendering action. It became to a dead end.
Based on the reason explained above, the fastest solution is remove the “[Authorize]” attribute from the controller. But if you don’t want change your code, go to IIS management tool, select the website your are running, choose “Error Pages”, and “Edit Feature Settings”, change “Error Responses” to “Detailed errors”.
173 views -
Install Linksys Wireless PCI Adapter(WMP54G) Driver for Windows 7 64Bit
Posted on August 21st, 2011 Add commentsSeems like linksys doesn’t provide wireless PCI adapter driver for new Windows OS. The only way to install driver for Windows 7 is force to install the driver from the chip company.
- Download the driver from Here
- Unzip to somewhere. Let’s say “C:\”
- Go to “Control Panel” -> “Device Manager”, look for this adapter. Normally it will be shown like “Unknown Network Controller” or something like that
- Click this device, select “Update Driver Software”
- Select “Browse My Computer for driver software”
- Select “Let me pick from a list of device drivers on my computer”
- Scroll down to “Network Adapters” and double click. Then click “Have Disk”
- In the box that pops up, navigate to “C:\driver_folder”, and select the driver file
- Scroll down to “Ralink Technology Corp” in the box on the left side. On the right side, select “802.11b/g Wireless Adapter.” (Here I have tried select “Linksys” on the left, and “Linksys Wireless Adapter” on the right. It also works! Just choose whatever you want)
- Click YES on the warning window (if you see it)
- Done! (Sometimes the device still might not be working, try to right click the device and uninstall the driver, but DO NOT check “Delete the driver software for this device”, and restart the computer. Then Windows will help you install the driver again)
1,028 views -
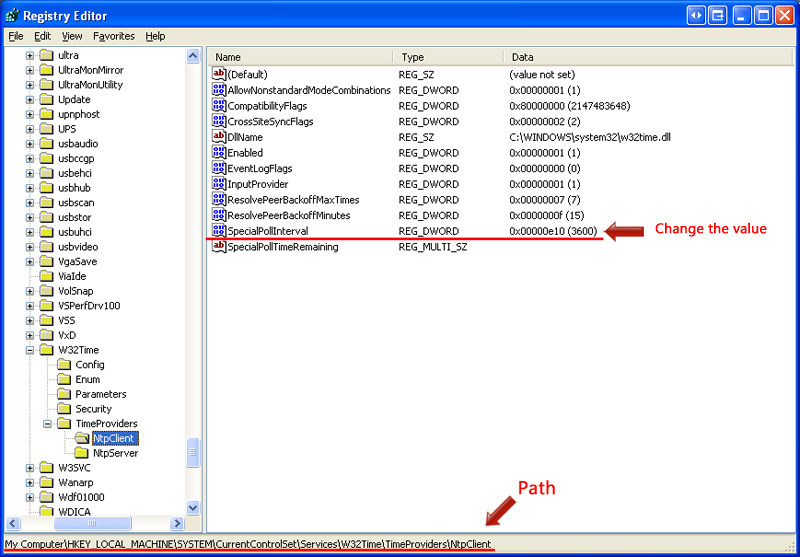
How to Change the Frequency of Windows Internet Time Synchronisation
Posted on September 28th, 2010 2 comments
636 views -
Multiple websites in IIS on Windows XP Pro
Posted on August 17th, 2010 Add commentsUnlike Windows Server Edition, XP pro does not support multiple websites in IIS. However, we still can use several ways around this.
First option, just use IIS Admin, a simple program developed by a third-party developer for this purpose. (Download From Here)
The second option is to use adsutil.vbs, located in the folder “C:\Inetpub\AdminScripts”:12345C:\Inetpub\AdminScripts> adsutil.vbs ENUM /P W3SVC#(Find out what the highest numbered site you currently have is)C:\Inetpub\AdminScripts> adsutil.vbs create_vserv W3SVC/x#(Create a new website, Add one to the highest numbered site)Where x is replaced by the new numbered site. For example if you run the first command and the highest numbered site is 4, then replace x to 5.
12C:\Inetpub\AdminScripts> adsutil.vbs copy W3SVC/1 W3SVC/x#(Copy website 1 to website x)The third option is to use Metabase Explorer from the IIS 6.0 Resource Kit Tools.Copy the default website (/LM/W3SVC/1/) and then paste it. This will also give you another website, ready to use. (Download From Here)
Also we can delete the website using adsutil.vbs, Metabase Explorer or ADSI/WMI. To delete a website using adsutil.vbs, write this in a command prompt:1C:\Inetpub\AdminScripts> adsutil.vbs delete W3SVC/x
610 views


Recent Comments